URAN Facepack – Ultra-realistic newgen faces

You want real faces in Football Manager instead of ugly plastic heads? With the new URAN Facepack, you can give all the newgens in your game a realistic look!
The URAN Facepack (Ultra Realistic, Allocated Nationally) contains 55,000 images – and can be assigned more precisely than ever before with the new „FM.Z Tool“. As a refined version of the renowned NewGAN Manager, it now takes into account a player’s nationality as well as their ethnicity.

Specifically: In NewGAN Manager, there were 14 region folders from which any image is assigned to a player. Now we use the ten ethnicities that Football Manager also uses – and subdivide within the ethnicities according to the associated nations.
Example using an English player with the ethnicity 0 (northern european):
- Previously: The player was given any picture from the ‚Caucasian‘ folder if the ethnicity was suitable
- New: The player is assigned a picture with the prefix ‚ENG‘ within the 0 folder, i.e. a picture of an English-generated player. If the player is English with ethnicity 3 (african caribbean), they will be assigned any picture from ethnicity folder 3.
1. Downloads
To give all the newgens in your save a realistic image, you need two things: the URAN Facepack and the FM.Z Tools.
1.1. URAN Facepack
The URAN facepack is available in two versions: with visible kits and as cut-outs.
- Download URAN Facepack „Cut-Outs“ (via Mega*)
- Download URAN Facepack „with visible Kits“ (via Mega*)
* Mega currently stops the download about halfway through and sends you into a 6-hour waiting period if you don’t sign up for a pro account. You can avoid the waiting time by restarting your router or getting a new IP via VPN. We are also working on offering the files on another hoster.
1.2 FM.Z Tools
- For Windows: Download via Mega or FM.Z Discord
- For Mac: Download via Mega or FM.Z Discord

2. How to
2.1 Preparation
- Download the FM.Z tools.
- Move the ‘filters’ and ‘views’ folders to your FM user folder. If folders with these names already exist there, merge them.
- You will normally find your user folder here:
Windows: C:/Users/Your name/Documents/Sports Interactive/Football Manager 2024
Mac: Users\Your Name\Library\Application Support\Sports Interactive\Football Manager 2024 (The folder is hidden.) - If not, go to ‘Settings’ in Football Manager. Then enter ‘User folder’ in the search bar and the path will be displayed.
- You will normally find your user folder here:
- Download one of the two URAN facepacks.
- Unzip them and add them to your user folder under ‚graphics‘ in a separate subfolder (e.g. ‘URAN faces’). We recommend 7Zip for unpacking.
- Install the FM.Z tools with the installation file you find on Windows in the ‘dist’ folder. On Mac simply drag the file into ‚Applications‘.
2.2 Export player information
In order for the tool to be able to assign the images to the individual players, it requires various pieces of information. This information must be exported from Football Manager in the form of an RTF file.
Important: This step is necessary every time you want to assign a realistic image to other newgans – after a youth intake, for example.
- Create a new unemployed manager in your save game
- Go to the player search with this manager
- Import the ‘is newgen search filter’ from the ‘filters’ folder and select it. Now all newgens in your score will be displayed.
- Import the ‘SCRIPT FACES Player Search’ view from the ‘Views’ folder and select it.
- Select all players with CTRL + A (Mac: CMD+A). This may take a few seconds or several attempts if you have integrated many graphic mods.
Test: Right-click on the selected players. The number of selected players must match the number of all newgens in the top left-hand corner. Otherwise, select again. - Create RTF file: Press CTRL + P (Mac: CMD+P) and select ‘Text file’ in the dialogue. Give the RTF file a name of your choice and save it to a location where you can find it again.
2.3 Assign images
Now the FM.Z Tools come into play. They read the information from the RTF file and create a configuration file (config.xml) that tells Football Manager which player image it should display for which player.
- Open the FM.Z tools.
- Create a profile. You need a separate profile for each savegame.
- Under ‘Select Image Directory’, select the subfolder in which you have saved the URAN facepack.
- Under ‘RTF File’, select the RTF file you have just exported.
- Select the desired mode:
- Generate for the first assignment (or to overwrite previous assignments)
- Preserve to assign further player images. Previous assignments are retained. Select this mode if you want to give other new players a realistic face after a youth intake.
- XML Cleanup to remove newgens who have left your game from the list. Attention: If your RTF file is missing newgens that have already been given a face, they will lose their image!
- Select FM version.
- Click ‘Replace Faces’ and wait for the programme to react.
(This may take a little longer than you are used to from the NewGAN Manager. In return, you will receive a list of everything that has been assigned).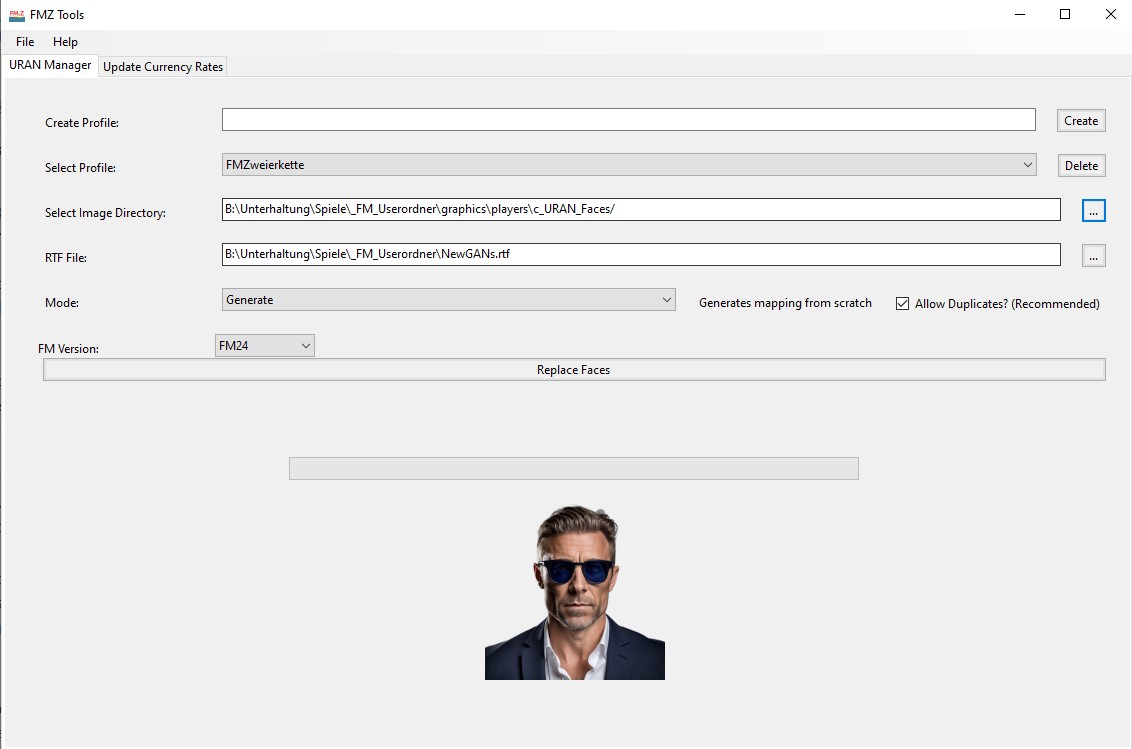
2.4 In Football Manager
- Clear cache and reload skin: In Football Manager, go to Settings to clear the cache and reload the skin. This will import the created config.xml and the FM will then display the images.
Note for multiple savegames: Only the config.xml of the selected profile is active. If you change your save, you must also switch to the corresponding profile in the tool (and then empty the cache/reload the skin) so that the appropriate image assignment is loaded. - The created manager is no longer needed. You can therefore either end his career or load a savegame before creating it.
Video tutorial
The following video from our friends at Sortitoutsi explains how to assign the URAN faces using the FM.Z Tools:
Wichtige Hinweise
FM.Z Tool and URAN Facepack are only compatible with each other! The folder structure created in the facepack and the naming scheme of the files must not be changed. Configs created with the NewGAN Manager cannot be adopted.
Have fun with our pictures and the nation assignment!
3. Staff faces
You can also use the URAN Facepack for staff. The procedure is as described in the instructions above, with two exceptions:
- Create your RTF in the staff search with the ‘SCRIPT FACES staff’ view
- Then add the images to your current profile using Preserve.
4. Troubleshooting
If something did not work, go through the instructions again step by step. The problem is often due to one of the following points:
- Did you clear the cache in Football Manager at the end and reload the skin?
- Have you selected all players in the player search? Compare the number of the complete list with the number of marked players.
- Have you loaded the correct view? The RTF file should contain the player’s ID, nationality, name and three numerical values. If your RTF looks different, go back to the player search and select the ‘SCRIPT FACES Player Search’ view.
- Is the correct FM version selected in the FM.Z tool?
5. Credits
A project like this is only possible with lots of helpers. Therefore, many thanks to the following people for their commitment:
Image creation: Flouw, Salty_Toad, Faro21R, FreshMo, Philipp, Latscher, LiquidSnake89, pfanne1988, pumiii, Rondon25, RoterBaron, Timii09, timmyfck, DBodes, LiverBird_FM, MikaNr2, Ruksson, Dave00, GameCrasher, Arnaud Feld
Image processing & quality control: GameCrasher, Arnaud Feld, DBodes, NorsemanLP
Banner creation: Rock’n Rolla
Beta testing: juve2004, Pitt77
Development FM.Z Tools & National Allocation: GameCrasher
Project management: GameCrasher, Arnaud Feld, DBodes
Special thanks
Lust but not least our special thanks goes to:
- Maradonna90/gestalt for the development of the NewGAN Manager, with which he revolutionised the topic of newgen images forever, and for the permission to continue developing on its basis.
- Rock’n Rolla, who originally initiated the project
- Tery Whenett and the FM.Zweierkette community, without whom the project would never have come to life
Are there any staff images ( in suits & tracksuits) that makes them look more like staff than players?
Hey Mark,
we have published staff faces alongside our first pack here:
https://fm.zweierkette.de/en/ultrarealistic-newgan-faces-english/
Please note that they are for manual assignment only.
Cheers Tery
„is newgen search filter“ doesn’t work with Staff Search‘.
Doesn’t matter, the tool only assigns newgen IDs and ignores everything else.
Seems like staff file does not have a config file therefore it does not load in FMZ tools with the same instructions but changing RTF? Or do we need to do staff faces manually?
You can assign the URAN facepack to staff the same way as to players; you just need to use the Staff Search view ingame.